Happy Monday! Just a quick update before my blog is taken over by our Guest Poster today...I was over at The Kurtz Corner yesturday sharing a yummy Christmas recipe, you should go check it out!!! I'm also over at Up Mommy Creek today sharing another recipe in a giftable jar for all you Christmas bakers. What can I say, tis' the season and I love to bake!!!! Also, I have a giveaway going on at Sunny with a Chance of Sprinkles for a $20 Shop Credit...go on over and say hi to Chelsea and enter!
We are going to start this lovely Monday off with a special guest post today! Please welcome Kim from Tiara's and Bowties...she's going to be showing us how to make some adorable ornaments! After you check out this post and enter the giveaway (at the bottom of the tutorial!), head on over to her blog to check out some more inspiring crafts and tutorials!
*******************
Hi everyone, it's Kim from Tiara's and Bowties - Think Smink!
I am a decorative artist, a wife & a mommy to 2.
With my daughter having special needs and an active 10 year old boy,
our days can get crazy, things change on a dime.
Painting is my passion, my escape, my therapy.
I also have a shop on Etsy called Think Smink Art.
Most of my items are customized and personalized with each individual.
I am super super excited to be here today at Imprintalish to share a cute little tute with you!
I had shown these cute little snow baby faces ornaments (as I call them) a little while back on the blog.
I am sharing the tutorial with you here today at Imprintalish!
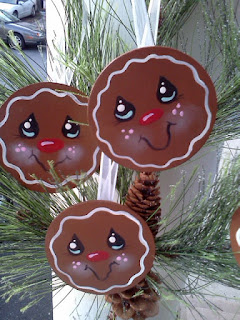
This tutes is kind of a 2 for 1 because with the same pattern and a color change you can make these adorable little gingerbread ornaments as well!
My ornaments were painted with regular acrylic craft paints, mostly with Plaid products, onto thin circles of balsa wood.
Don't limit yourself to just wood!
You could paint these on Christmas cookies with edible paints/markers & cupcakes too!
Oh and by the way, my strong suit is not editing or making pdf's so please use the photo below as a guide to making your pattern. Feel free to right click and save, resize, then print to use as a pattern.
It was meant to be a game for your preschooler but since I am totally not skilled enought to make it a nice PDF for you... a pattern it became!
(sorry)
Snow Baby Faces: Base each circle with white paint. I add a mother of pearl glaze on top to add shimmer. (I am a glitz and glitter addict!)
Gingerbread Faces: Base with brown. I used a brown called Nutmeg.
2. The button noses are a simple oval of red or reddish pink.
4. Go back with a thin liner brush and pull the circles up into a triangular shape. The teardrop eyes are so so adorable.
5. Using thinned down black paint and your liner brush, draw a squiggly smile. Another option for the snow babies is to use the oposite end of your brush and dot circles into a smile.
6. Gently pull out 3 very thin eyelashes from the bottom outside edge of both eyes.
Below you can see what a difference the next few steps make in bringing your little face to life! Everything is basically done at this point except for the addition of a few white dots and commas.
8. Add three white dots to each cheek. All three dots come from one dip of the end of your brush.
9. Using your liner brush, pull a thin comma shaped stroke across the top of the nose for a highlight. If you're not comfortable making the comma, add two or three dip dots across the top for a similar effect.
I've enjoyed sharing this cute little project with all of you today.
I hope you have fun making some for yourself!
Pick up your paintbush and give this a try, you may feel like a little kid again!
Lish, I thank you immensly for allowing me to share this project today with your readers!
Drop by Tiaras and Bowties to say "Hi".
Friends are a special blessing, we could all use more of them!
(note: This project is inspired from the memory of a project I had seen Oh, 10 years ago from a painter named Jamie Mills Price. My faces are modified to make them my own!)
**********************
Thanks Kim, what a cool project! Kim is also graciously giving away something from her shop!!!! Check out these Birdhouses courtesty of Think Smink Art....
One lucky winner will win all three of the birdhouses pictured!!!


6 comments:
Great tutorial! I love Kim's birdhouses!
~Angela
The Not So Functional Housewife
Very cute!!
I just received our giveaway prize from you and I am ecstatic!! You can see it here: http://domesticallyunemployed.blogspot.com/2011/12/early-christmas.html
Thanks Lish for allowing me to hijack your blog today! I had so much fun creating those little ornaments, good luck to all in the giveaway!
Kim
Kim's birdhouses are super cute!
LOVE the ornament tutorial!
she makes it look sooo easy, doesn't she? a great tutorial from a talented woman! these are so darling.. i love them!
Love your ornaments. Great job. The birdhouses are just darling!
Post a Comment