
Last week I posted this tutorial over at Happy Hour Projects and just wanted to reshare it in case you missed it. The story behind the idea-I am so unorganized lately! Since becoming a mom of two, my organizational skills have disappeared. I used to be the list master (ask my husband!), everything had a spot and I knew exactly what I was going to do next! Now with a small home business, blogging, two kids, a husband, cleaning that needs to be done...it is never ending! So, I came up with a customized way of staying organized, and it doesn't involve a whole lot of sewing-just a few hand stitches!


Scrap Fabric
8.25" x 5.75" Day Planner
Hemming Adhesive Tape
Scissors
Iron
Measuring tape


1. Measure, mark and cut the fabric around your planner. Leave an extra 1.5 inches around the top and bottom and an extra 3.5 inches on the ends. Double check the measurments of your planner before you begin cutting. As you go along through the steps double check how the planner cover will fit!

2. Once you have cut your fabric to size, iron out any wrinkles. Then turn over so that the backside of the fabric is facing you. Starting at the top, fold fabric over 1/2 inch and then 3/4 of an inch, use the iron to crease the fabric in place. Do this to all four sides.

3. Line up the Hemming Adhesive Tape underneath of the creased fabric, make sure it is completely covered by the fabric. Follow the instructions that came with the hemming tape. Iron in place. I did the top and bottom first and then the two ends.


4. To create the book flap, measure in 2 inches from the ends. Working with the backside of the fabric facing you, fold fabric over and pin in place.

5. Add a couple of stitches to the top and bottom corners to hold in place. Or if your feeling energetic, you could stitch along the entire top and bottom where the edges meet!

6. There! Your day planner jacket is complete! Try it on for size!

**************************************************
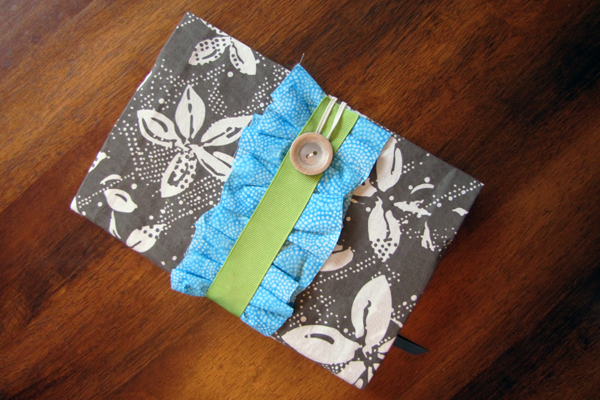
So...you could just leave it as is...or you can jazz it up!!! I totally choose to jazz it up! You could add some ribbon, some fabric flowers, a monogram...just grab whatever you have lying around. I found a piece of leftover fabric, a button, ribbon and an elastic. This is what I did.

1. I quickly hand stitched through a strip of fabric and kept pulling the thread until I got the ruffle look I was after. I left the edges raw and I didn't measure it at all. I only layed it on top of the planner to make sure it was the right length and then tied off the thread.

2. I measured out enough ribbon to wrap around the planner. Use the iron on hemming tape to attach it over the stitching on the ruffled material. I left the ribbon to cover the back of the book loose. Then I stiched a button onto the front of the ruffle. Placement is totally up to you!

3. Again use the heming tape to attach the ruffle part to the planner cover, don't attach the ribbon onto the back just yet.

4. I cut a small piece of elastic to wrap around the button on the front of the planner. It was roughly 5 inches long and then folded in half. To finish off the back of the cover, lay hemming tape under the last bit of ribbon and under the elastic. Iron in place.

5.Voila! Your planner cover is complete!

6. I got a downloadable calender here. I printed it off and glued it into the front page. I am going to use this page to mark all my appointments, birthdays and holidays.

7. For the inside of the planner, I made a daily template and glued them onto the pages, one for every day of the month. I used the lables "To do", "Blog to do's", and "Meals". Perfect for the mom blogger!
Click the photo below to get your free download!


Well, I know it has certainly made my life more organized and a little less stressed, and as a bonus, its so nice to look at! Hope you have fun making your life a little more organized too :)


9 comments:
Lish, this is awesome lady! OMGoodness... if I could only sew a button. I am seriously not joking, I know it's pretty sad! That is actually one of my goals for the year, learning to sew. I really need a planner though, I'm finding it very difficult to keep track of all the PC's and blog hops I want to join. Sorry for the rambling girl! Xo
This is so cute! I'm a planner girl myself, my hubby is always trying to get me into putting stuff in the computer, iPod, etc but I like actually writing it down! I make my own planner pages as well!
i like the fact that if you wanted to you could remove it and reuse it on a new planner! thanks for linking up to my tip-toe thru tuesday party! hope to see you again this week!
You are obviously well organized! That planner is adorable and your tutorial is fabulous!
Cute cute cute! Love it! Seriously, I know it is a generic comment but that is how I feel!
This is so cute!! LOVE how you dressed it up! That ruffle is adorable and all the colors look awesome together!!
Love the color combination! What an adorable planner!
Cute planner! Good explaining too, maybe I'll try it :)
Very nice, I always wondered how to sew a book cover like that. You
made it look easy. Thanks for sharing. Kathi
Post a Comment