Home About Shop Featured Contact Sponsor
Showing posts with label tutorial. Show all posts

Thursday, March 7, 2013

Loves on a Thursday-Homemade Coconut Scrub


I'm itching for warm weather, an uncomfortable need fresh air that doesn't knock the wind out of you itching. So in my attempts at inducing Spring I've been working at getting my feet ready for flip flops-yes, a little far fetched but whatever, I can do what I want...hehe...

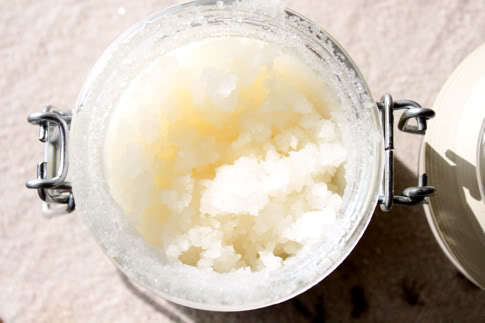
There are a bazillion recipes out there for body scrubs, but I thought I'd share mine with you anyways. You can basically add any ingrediant as long as you keep the base of the recipe the same-1 cup or sugar and 1/3 cup of oil. I'm a sucker for anything that has coconut in it, so what-dya know I made a Coconut Brown Sugar Scrub.


What you'll need...

1 cup sugar
1/3 cup coconut oil
2 tablespoons corn syrup
1/3 cup shredded coconut


First, I softened the coconut oil in the microwave for a few seconds, it just made it easier to mix. Then I added all the other ingredients to a mixer or you can use a hand blender, I seriously felt like I was baking cookies and every time I see it on the shelf in my bathroom, I want to eat it! There, you've been warned!!!

To use, just grab about a tablespoon in the palm of your hand and rub onto moistened feet or elbows, wherever you need a little TLC. I even like it on my hands, although it may be too rough for someone with sensitive skin.

Some other alternatives to the coconut would be, epsom salts or a combination of sugars, raw, brown or white. Try adding cinnamon or vanilla, maybe a zest of lemon or lime?! I've also made this with olive oil too!


Some other scrubs and DIY lotions I'd love to try...

-

Home Spa Recipes - Vanilla Citrus Sugar Body Scrub

Homemade Lotion

Yes, there's really bubblegum in this lip scrub!!!

And my apologies...I have not even made it around to check out all your loves from last week :( But don't worry I'll get there!!!!! Thanks for linking up with us!

Are you a Pinner? Etsy stalker? Blog hopper? Photographer? Have cute kids? Loving life? Always looking for pretty things? I would love to see what your loving lately!

Grab a button and link up your pretty finds!
Loves ona Thursday


PRIOR TO LINKING UP

Colleen and I would love for you follow us :) If you could provide a link back or display our button in your post, we would love that! And please credit the original source when using other's projects and photographs!


Sunday, January 13, 2013

Blog Design-HTML Tutorials & How to's


Do you guys change your blog design up every so often or am I the only one that gets bored about every 2 months or so, LOL? It's been about a week since I implemented my newest design...what do you think? The New Year was calling to me and said it was time for a fresh new look :)

I've mentioned before that I would love to pay someone to do it for me, but in reality I don't have the cash and I would probably be the worst client ever. I would change my mind constantly and they would fire me! Haha! So alas I do it myself.. grunting and groaning through html and using my good pal GOOGLE! But it's a great learning experience, you just need the time and patience!


So for those of you that would like to give your blog a little pizazz, I've rounded up some tips and info to help you out...easier then spending 2 hours researching everything or paying $200 on a design!


First things first, I am self taught in this whole area and while the following methods worked for me, they may not be technically right, but they worked, so who am to complain :) I also am using the Simple Template on Blogger, while researching I noticed that many codes differed slightly with different templates. Also, when working with html, holding down the CTRL key and F key at the same time will bring up a shortcut for finding specific parts of code! All graphics used on my site are designed by me on Photoshop, although similar types of images could be made using other photo/paint type programs!


For a handy list of basic HTML knowledge, check out this post.


REMOVING YOUR HEADER

In your blogger dashboard, go to the TEMPLATE -HTML {back up your blog first!} Use CTRL + F keys and type in ".header-outer", to search for the following code...

/* Header ----------------------------------------------- */ .header-outer { background: $(header.background.color) $(header.background.gradient) repeat-x scroll 0 -400px; _background-image: none; }


Next, add the following code before the closing }


display:none; 

Instead of the top header look, I choose to use a lower header, aligning it with the top of my sidebar, like this...


To add that, go into Layout, and add gadget. Choose the HTML gadget and insert image HTML. Move above your blog post area :)

CHANGING SIDEBAR BACKGROUND COLOR


I used this tutorial to change my sidebar color...have fun with a million color combos :) For a full list of html color codes, go here. For a seamless look, when you are designing your images to place onto your sidebar, make sure the background color is the exact color of your sidebar background.

REMOVE BORDER/SHADOW FROM IN POST PHOTOS

In your blogger dashboard, go to the TEMPLATE-CUSTOMIZE-ADVANCED-ADD CSS. Paste the following code, pressing enter after the last line. 

.post-body img, .post-body .tr-caption-container, .Profile img, .Image img, .BlogList .item-thumbnail img { padding: none !important; border: none !important; background: none !important; -moz-box-shadow: 0px 0px 0px transparent !important; -webkit-box-shadow: 0px 0px 0px transparent !important; box-shadow: 0px 0px 0px transparent !important; }

CREATING ROLLOVER IMAGES

A rollover image is an image that changes when the mouse/cursor hovers over it. I used rollover images on all my FIND IT buttons on my sidebar. Head on over HERE to grab the cod. Go ahead and hover over the image below to see it in action...


So that's a wrap...I hope I inspired you to roll up your sleeves and get creative with your blog design, or to perhaps start to think about making some pretty changes :) One thing that I absolutely believe in, is that first impressions do count! 


linking up with 52 Mantels, Live Laugh Rowe, The Foley Fam {Unedited},Adorned From Above 


Photobucket
PhotobucketPhotobucketPhotobucket

Monday, January 7, 2013

Fabric Wrapped Rosebud Tutorial

Today I am going to show you a quick and easy way to make a fabric wrapped rosebud! These little cuties look great perched on top of gifts, strung together on a necklace, or as earrings and hair clips!


Supplies
Scrap of fabric cut into a strip 
{mine was 5 inches long and 1.5 inches wide-depends on the size of rosebud you want}
Hot Glue Gun
Scissors
Felt for backing {if needed}


1-2//Fold both side of your fabric in towards the center of your strip.
3// Fold the outer corner down towards the bottom, creating a triangle.
4// Add a dot of glue.
5// Roll the outer corner towards the rest of the strip{towards you as your holding it}creating a little bud.
6// Create a small twist in the longer piece of fabric and start wrapping it around the little bud, glue in place after your twist. 
It was kinda hard to keep twisting and to take pictures, so I will do my best to explain.  
7-8//Basically you want to keep wrapping it around the center, but create a twist in the fabric as you wrap. After each twist, place a dot of glue to secure.

9// Once you've wrapped your length of fabric or have gotten to the size of rose bud you like, do one last twist to turn your fabric towards the bottom. Glue in place and cut off the access fabric.


Tada, your very own rosebud!

If you like, you can place a small circle of felt over the back for a nice, clean look.

If you get addicted to making these cute little things and your fingers have survived the hot glue, check out these DIY rolled flowers that I made awhile back! I've always had an abundance of fabric laying around, left over scraps and bits and pieces from projects...and of course who doesn't own lots of t-shirts?! Actually, if I'm being honest, my husband is probably the one who has lost the most t-shirts due to my creative itch, hehe! 

Photobucket
Photobucket Photobucket Photobucket

Monday, October 29, 2012

Simple DIY Fall Wreath with Courtney!


Hey friends of Lish!  I'm happy to be back here with you as it has been a while since I dropped in with a post!  Hope you are having a fantastic start to your Fall!  As I type this I am currently wondering how prepared I need to get for the impending catastrophic devastation coming our way via Hurricane Sandy. After Ilene last year, I'm having a hard time not being a jaded New Yorker!  But I digress!

I had a moment this week to finally put together a Fall wreath, and I know you will love this simple DIY! For the supplies, I found them at Target of all places in the dollar spot!  I think I spent $6 on the vine wreath and silk flowers, the rest of the items were leftovers from last year.  To copy this you'll need some yarn and ribbon.  I chose colors that were warm and rich, reminding me of the last days of warm sunshine before Winter.


1.  Begin the wreath by winding some yarn around it.  You can start the yarn by tying it directly on the wreath, then cut a decent length of yarn so you can go around the wreath twice in a spiral pattern.  Once you have it how you want it, tie the end piece on as well and trim any excess yarn.


2.  Next, twist some ribbon around the wreath, also in a diagonal/spiral manner.  I used ribbon that had a bit of wire molding to it so it stayed in place, but you can glue the beginning piece with the hot glue to keep it where you want it.  After you get it placed how you like it, trim it and glue down the ends so it stays in place.


 3.  Next, you'll want to add your silk flowers and other plants.  For this part, I clipped the stems of the sunflowers so they were only an inch or two from the base of the flower.  With vine wreath you can weave the stems easily into the wreath.  I would recommend you experiment first with the placement of your flowers until you are satisfied with its look, then put some hot glue directly on the stem, and slide the stem back into place.  I was able to pull apart the branches of my berries and weave them throughout the vine wreath without needing hot glue at all.  And finally, I took the leaves and put a bit of hot glue on the stems and placed them where I wanted them.


4.  I chose to use a coordinating ribbon for a bow - and then I couldn't figure out where I wanted to place the bow.  There is really nothing to this bow, and its quite simple to create using ribbon that has a bit of wire molding to it.  You pretty much just loop the ends around and tie a small not, then play with it until it looks pretty.  ;)  Once you figure out where you want your bow - top or bottom, or even if you want the bow I should say, then glue it in place.


5.  Voila!  Simple Fall Wreath - inexpensive, festive, Fall!  After the glue is dry - simply hang it on your door using a wreath hanger.  Thanks for sticking around to check this out!  I'd love to hear your simple Fall decor ideas, so please feel free to leave links in your comments below or stop by my blog and say hello!


I'm Courtney, a wife, mama and writer. 

My blog Baxtron{Life} is a place where I share everything that I love, lots of pictures of life in NYC with our little family of three, daily musings, fun link-ups and some of the real struggles of my life.  

I would love to connect with you via: Twitter, Instagram or Pinterest! Come say hello!


I love this! Proof, that you don't have to spend big bucks to get a fabulous look :)
Thanks so much for sharing Courtney!!!!

Photobucket
    Follow along on Twitter  Facebook  Pinterest

Tuesday, September 25, 2012

DIY Coat Rack Revamp


Remember the Coat Rack from this post? 

Originally, I thought of using it in the toy room (painted yellow) to hang the boys' costumes and hats on...BUT then I found myself needing a rack or something to display my scarves on in a local salon, so I started brainstorming and this is what I came up with...

First, I removed the hooks and soaked then in combination of CLR and water {cause who knows what was on them last!!} and then gave the stand a good wash and scrub followed by a light sanding {I hate a long drawn out projects and knew that I wanted a distressed finish, so I wasn't really following any How To's on how to properly finish furniture {So if you have a really nice piece of furniture you want to refinish-please don't follow my instrutions!}


Next I painted the rack with two coats of white paint.While I waited for that to dry, I washed and rinsed the hooks and then I sprayed them with two coats of Black spray paint.


The next day, I gave the whole rack a light sanding to rough up the edges for a rustic and worn look.


And voila...here it is in action!!!


A pretty little stand to show off some of my accessories at Glow Hair Studio!!

Linking up with...Homework, Funky Polkadot Giraffe, Vintage Wanna Bee, Live Laugh Rowe, 52 Mantels, I Gotta Create, The 36th Avenue, Happy Hour Projects, Tatertots & Jello, Create & Inspire

Photobucket
    Follow along on Twitter  Facebook  Pinterest

{Featured Sponsor}


Photobucket