Home About Shop Featured Contact Sponsor
Showing posts with label decor. Show all posts

Thursday, July 23, 2015

Eclectic Chic Dining Room-Chairish Mix n' Chic Challenge

I am constantly dreaming about making our space pretty-practical and comfortable but still appealing to the eye. As of right now my style is an eclectic blend of traditional and vintage, with a heavy dose of toys.

Sigh....

There's really nothing I can do about that right now. Those bright blue, yellow and red plastic things just keep popping up!

So I dream....and dream...and rearrange, and scour the internet for inspiration, I thrift my way through antique markets and second hand stores and just dream. I love the way that adding in an item that has a story makes a room feel complete and real. It just gives it some depth and love, you know? Weathered wood, galvanized metal, rustic signs, crates...all the goodness of Shabby Chic!

When Chairish contacted me to take part in their Mix n' Chic challenge I knew this was the perfect chance to put my dreaming onto paper! If you've never heard of Chairish-shame on you! Chairish is an exclusive, curator approved, online marketplace for vintage and used furniture. Most styles go in and out of fashion, however; the Shabby Chic-ness of antiques and vintage items has continuously been a decor focus for the last 25 years; The spirit of the style is to work with what you have while mixing in historical elements and pieces with charm. The best part about decorating these days is that the matching look is out - the new look is all about creating a room that seamlessly blends a variety of styles., and that is my style to a tee!

Monday, October 27, 2014

It Got Spooky Around Here...*Halloween Decor*

Tis' the week of ghosts, goblins and zombies! My husband and I love Halloween and prior to kids we went all out-like gross blood and guts and a Halloween party to boot! But now we've toned things down in favour of the kiddies....we haven't crossed to the dark side of blow up bouncy things on the front yard though! We keep it simple....


Skeletons and spiders never go out of style and make it super easy to dress up your existing fall decor!
I love using pieces from nature too-less expensive and it gives tons of texture!

One of our favorite finds is this sign hanging on our front porch! It either says welcome or go away...depends on our mood :) It's kinda fitting for it to flip to the go away side for Halloween!


The front porch got a dose of spookiness too...oh, and check out my new cushion on the loveseat! You may remember my plans for our front porch here. It's well on it's way-but the magic will happen next year!


How about you-are you ready for Halloween?

Photobucket
Photobucket Photobucket Photobucket

Sunday, June 16, 2013

My New Chair

For months (a year?) I've had this boardroom-ish chair sitting in our basement, waiting for an overhaul. I'm not sure what drew me too this chair to begin with, maybe it's simple lines and mix of modern and retro, it reminded me of the chairs that would sit in the office in elementary school...not sure if that's a good memeory or not, haha...

None the less, it caught my attention and I had big plans for it....


Tuesday, February 26, 2013

Spring & Easter Mantel

If you follow me on Facebook, you'll know that I have been having a small case of 'bloggers block.' I've been working on a post, but just can't seem to find the right words to explain, so until then...you get some crafts. Cause it requires a little less words and a lot of pretty pics :)

So to begin, last week I posted some Easter inspired decor pics that included using black...which is how my Easter Mantel came to be!


The backdrop for my Easter Mantel was some fabric covered embroidery hoops, which have been in my closet forever-awaiting another project, but I scooped them up for this in the meantime. 


For the one, I used a plain cotton in a natural tone and stamped the word SPRING on it. The final touch was some pretty flower pins{that you can get with some of my scarfs in my shop. See?! you really can clip them onto anything!}


 I needed something else to balance out the black and white fabric so I used some scrapbooking in frames...


With the leftover paper I shredded it up to make some filler in the bottom of the glass vases, which provided the perfect contrast to the brightly colored eggs!


The final touch was the paper flowers, I knew immediately that I wanted black and white ones, which is kinda the total opposite of what spring stands for, but hey, it's fun and quirky, so I like it :) 


Overall I love how it turned out!!! It was a complete contrast to my Spring Mantel last year which was all pastels, however I still had to include the turquoise! 

So the trick to using black in such a colorful season dedicated to bunnies and eggs?  Use it sparingly. Make sure you balance it with white to brighten it up, and toss in your favorite color too :) I wish I had taken a pic of it from a distance, where you would see that on either side of my fireplace I have very dramatic black and white nature prints, which also help to pull it all together!

Have you decorated for Easter yet?


Photobucket
Photobucket Photobucket Photobucket

Sunday, December 16, 2012

Christmas Home Tour 2012

I don't think I am ever completely finished decorating until the day before Christmas. There always seems to be a project on the go, or something I find in the closet that should have gotten put out...none the less...it's done enough that I can show you what happens inside our house as we get ready for Christmas. 

You've already seen my Mantel earlier this week, which sets the mood for the rest of the decor. I like to think that it's a blend of modern and traditional but entirely eclectic! Turquoises and creams, burgundy with splashes of red, gold, brown, and some pink...really no color is off limits in our house!


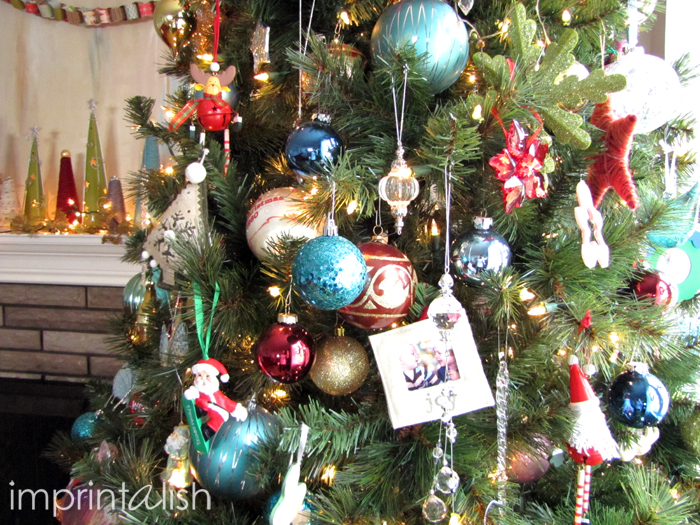
We got a brand spankin' new tree this year, and it is twice that size of our previous tree {which is now in the basement for the kids to decorate as they please!}Our ornaments are a collection of old and new, some that the kids have made, some that I've made...it's the perfect balance!


My hanging ornament display.

A few collections on the shelves in the dining room.

Our dining room chandelier got jazzed up with some Christmas balls and twine.

We recently added this plank style board to our dining room wall, it used to be Grayson's headboard! I'm still unsure what I want to do with it, so for now I hung a frame and some pom pom garland...

Square glass vases line with window sill above the sink, filled with beads and vintage ornaments.

 A tin sign and more vintage ornaments sit in the corner of our counter.

Just an FIY this is the cleanest you will ever see my craft room {to see it in all it's glory, go here}. The Christmas decor is fairly simple in here, some pom pom garland hangs over our chalkboard, where I had planned on writing out a Christmas song, but my 3 year old was very insistent that I was not allowed to erase the Christmas trees that he drew!

 This year I decided to display our cards and pictures on this chicken wire frame, it's usually home to magazines clippings and random things. The sparkly clothespins are super cute, eh? Such a simple project to liven up some drab clothespins!

Much like my yarn wrapped star on my tree, here are some smaller ones hanging on a branch {you really must try this tutorial-it's my favorite Christmas craft}Oh and if your wondering how the heck I kept everything so clean to take pictures...well, I took photos of one room a day and just kept moving the junk from room to room, hehe-hence the mess in the kitchen {you can see a bit in the above photo!} Who says life is perfect!

Are you ready for the big day yet? Next on my list is wrapping...falalalalalalalaaaaa....


Photobucket
    Follow along on Twitter  Facebook  Pinterest

Saturday, December 8, 2012

My Christmas Mantel

It was kinda by fluke that this mantel even happened..as I was laying out all my Christmas decor I just happened to have all the 'trees' together...and well, the rest is history!
I had made some new yarn wrapped trees this year for a craft sale, and I am secretly happy they didn't sell ;) Those together with some I made last year and some ceramic ones, created the perfect collection! On the top of the new ones I used old beads and bits from a necklace that fell apart... Around the bottom of the trees I used a light garland with gold leaves and white mini lights-because in my opinion you can never have enough mini lights!
My mantel was complete with the addition of last years paper chain. I got the inspiration here, and am in love with how it turned out!


Linking up with 52 Mantels, I Heart Naptime, Embracing Change, Alderberry Hill, Mercy Ink, Crayon Freckles, I Gotta Create, Live Laugh Rowe Blissful & DomesticTatertots & Jello, Homemaker on a Dime, Homework

Photobucket
    Follow along on Twitter  Facebook  Pinterest


Tuesday, December 4, 2012

Easy Peasy Hanging Ornament Display

I've been all about the super easy projects lately. And when I happened upon this vintage frame at a craft sale, I snatched it up!! I had no idea where it would end up but knew it wouldn't go to waste...

I love the intricate details on the frame and the color was perfect just the way it was, so all I did was give it a little wipe down and it was ready to rock n' roll! I'll probably use it in various ways throughout the year, and since the holiday season was here, I decided it needed a little bit of bling!

The hanging wire that was on the back was in rough shape so I cut it off and strung a very thin wire a little over 3/4 of the height of the frame opening. 

I finished it off with a small collection of ornaments in a variety of colors that coordinate with my holiday decor...and tada! A pretty little statement piece on the side table in our living room!

 You could easily do this with any old frame, big or small!


Photobucket
    Follow along on Twitter  Facebook  Pinterest

Tuesday, October 30, 2012

WW-And the award for the messiest craft area goes too...ME!


You guys...I had no idea how much time and work would go into preparing for a Craft Show...and to be honest with you, my work space has looked like this for the past month...

Minus the toys, which are not usually in there, but on this day I was trying to get loads done without walking back and forth between this room and the toy room, where two screaming boys were needing my attention every 2 seconds....

 Ya, it's really messy. In fact I have no idea how I got anything done...

I'll tell you this much though, I can't wait till this weekend is over so I can clean and organize things :)

How about you, what does your craft room/work space look like?

Linking up here...Project Alicia

Photobucket
    Follow along on Twitter  Facebook  Pinterest

{Featured Sponsor}

Photobucket