Home About Shop Featured Contact Sponsor
Showing posts with label valentines day. Show all posts

Sunday, February 3, 2013

Valentine 'Love' Painting for the Kiddos

So I really enjoyed last weeks Scavenger Hunt and was all keen to go for this weeks prompts, and then I got lazy. So instead I have a quick little Valentine's project that is kiddo friendly! I think I may have spotted something like this on Pinterest, but again, I'm too lazy to go hunt it down, so if you want to see the original inspiration, you'll have to go track it down your self :P

All you need is a blank canvas, some masking tape & some paint! I taped off the word LOVE {but you could do any word, really!} and let Grayson go to work!

Oh, and if your like my son, you will need some sort of painters hat..hehe...

Just paint over top of your taped off words...


I peeled off the tape while the paint was still wet, but I suppose you could wait till it's dry as well...

...and voila! I little Love for the mantel!!

p.s. just listed new spring items in my shop :D

Linking up with Homemaker on a Dime, Alderberry Hill

Photobucket
Photobucket Photobucket Photobucket

Wednesday, February 1, 2012

Valentine's Mantel


Happy February!!! I'm going to share my Valentine Mantel with you in just a bit, my house kinda got over decorated with hearts for Valentine's Day this year between my crafty inventions and the kids crafts. But first make sure you stop by Braxtron {Life} cause I am sharing some yummy sweet love with a delicious sugar cookie recipe! In other lovely monthly news, my sidebar looks pretty doesn't it? I am working with a ton of talented Sponsors this month and would love for you to go on and give them some sweet love too!! Are you sick of the LOVE word yet?...hehe...

I had fun doing this mantel!!! Lot's of pretty girly pinks and reds...I try to squeeze it in anywhere I can, since I'm the only female in the house!

Gray actually got this 'Love you to the moon and back' sign from his Granny for his birthday, I thought I would sneak it out of his room for the month! That is my DIY Felt Art in the background too-super easy project!

One of my photography prints framed...I think this one will end up in the kitchen eventually. 'Yes Dear' is actually a often told joke on my husbands side of the family.


I hope you stick around cause February is jam packed with Guest posts, giveaways and a Blog Series that I am participating in! I will be blogging about what has or hasn't worked for me while trying to grow my little corner of the internet along with some other awesome ladies! I also have another feature that I am adding to my blog and that is a Contributors section (check over in the sidebar!)...you'll see these 3 ladies around my blog here and there more often now :) Plus, I will keep you updated on my kitchen reno and of course be showing off photos of my adorable little men to you :) Oh, and today is the last day to enter to win your very own copy of the My Memories Digital Scrapbooking software!
Grow Your Blog

Lish

Friday, January 27, 2012

3 Valentine Garlands

I've mentioned before that I love Valentine's Day, but not because of the meaning behind it (love should be shared every day-not just one day a year!) I love it because of all the fantastic crafts that can be made!!!! I'm going to share with you three Heart Garlands that I've made, two are new this year and one is from last year.


Twinkling Doilies

Supplies

Strand of white mini lights
Package of white and pink heart doilies (dollar store!)

This is the easiest project ever! Simple poke mini light bulbs through the top of the doily hearts. That's it!! DONE! LOL!


Melted Crayon Heart Garland

I had been thinking about these Melted Crayon Hearts for a bit now and I was dying to try them out for myself! I thought it would be a good craft for Gray and I to try out together. I was mistaken though and ended up doing it on my own, which was probably for the best because it got quite messy!!! 

Supplies
A handful or crayons
Knife
Wax Paper
Towels
Iron

Start by peeling the wrappers off the crayons (this is not as fun as it sounds, LOL) My fingers were pretty sore! Then take a knife and cut up the crayons into tiny pieces. The smaller the better. I found that some of the chunks took forever to melt, so next time I will keep chopping away!

Lay out a towel on your ironing board, followed by a piece of paper and then a piece of wax paper. Scatter the crayon pieces around, spreading them out well. Lay another piece of wax paper over top.

Fold the edges of the wax paper in two to create a seal to keep the melting crayons in side the package. Place a piece of paper over top.

Place a hot iron on top for a couple minutes, moving it around to melt all of the crayon pieces. Since some of my pieces were thicker, I had to leave it on that area for a bit longer!

After ironing you are left with a sheet that looks like this. Now you can start cutting out your hearts, I just free handed mine, but you could use a stencil if you like.

I love how they turned out and I may just leave them up all year round!

Sewn Paper Hearts

This one is from last year and I unfortunately don't have a tutorial for it, but you basically cut out hearts onto a variety of scrapbooking paper and sew them together! For some of the hearts I grouped three together and then fluffed them up after sewing to give it a 3D appearance.

How do you decorate for Valentine's Day?

Lish


This post is Sponsored by Gaia Metal Studio.


Linking up at: Freestyle Friday, Do Something Crafty, Shine on Fridays, Weekend Wrap Up Party,
Feature Yourself Friday, Cheap Crafty Mama, Someday Crafts, Whatcha Got Weekend, Sharing Saturday, Just Something I Whipped Up, Creative Blogger's Party, Do Something Crafty

Tuesday, January 24, 2012

'Love' Felt Art

Today's DIY was for a guest post that I did over at Live.Laugh.Rowe last week, but I wanted to share it with you in case you missed it. It's super easy and barely costs a penny (ok, maybe a couple dollars!)


Supplies

8x10 Felt Sheet- I found mine at the Dollar Store -3 for a $1!
Scrapbooking paper
Letter Stencils-I used some Wooden Letters I found at the Dollar Store
Scissors
Frame- I used one I had laying around the house, I believe it's from IKEA

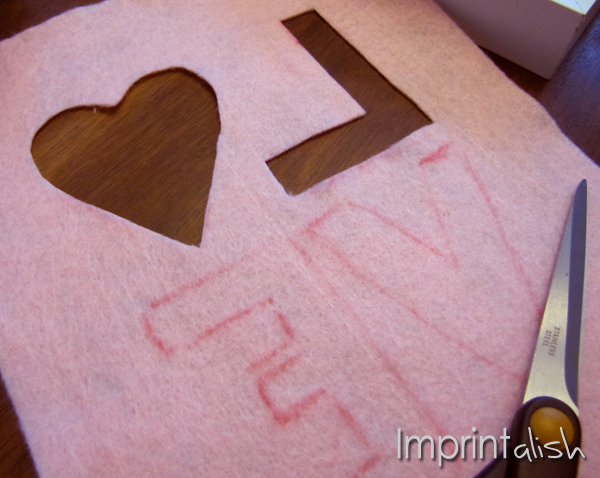
I used the word LOVE, and changed the 'O' to a heart. However any word would work! I didn't want the marker to show after I cut out the letter so I traced the letters backwards onto the felt sheet. I tried to use a marker that wasn't really dark or heavy as I didn't want it to show through once I flipped it over.

Cut out your letters carefully with scissors.

Flip the felt over and place it over top of your choice of printed scrapbooking paper.

Place into a frame and voila! Pretty Felt Word Art...there are so many possibilities with this!

Lish

Monday, February 14, 2011

Happy 'Love' Day!

h

Happy Valentine's Day! I hope you get to spend the day doing something you love, whether it's with that special person in your life, your friends, your family, a furry pet, a cup of coffee or just enjoying some quiet time on your own. Have a fantastic day!

Saturday, February 12, 2011

Baking sweet goodness

f
Gray and I had a day at home together yesturday...just the two of us...some mom and son bonding time! So what did we do? Well, we baked for Valentine's Day of course!!


 Yum-butter & sugar! This kid will eat anything!


s